Pipeline
A pipeline is a repeatable procedure consisting of actions for running ML tasks. You may define a pipeline for a subset of common ML tasks. You may even define an end-to-end pipeline to fulfill MLOps that retrains and evaluates the model for new model designs or dataset and finally deploys the ML application to an experimental or production site.
Basic Pipeline
Note
This section is about the pipeline feature accessible in basic projects. Refer to the VC Pipeline section for the advanced pipeline feature in VC projects.
Create a Pipeline
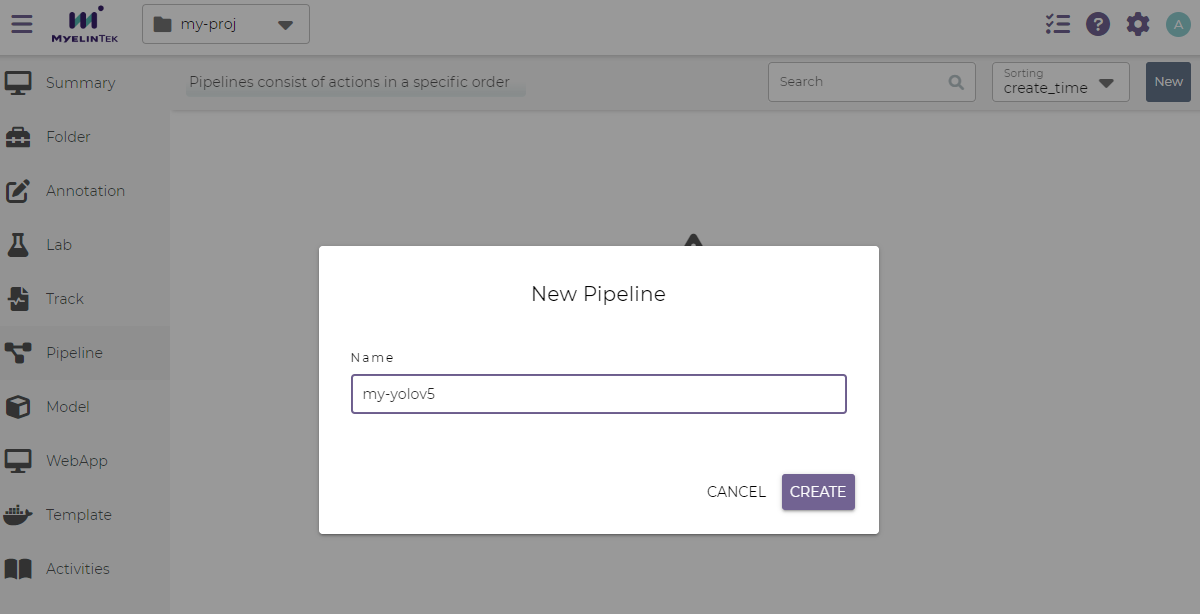
To create a pipeline:
In the project page, click on the Pipeline item in the left menu.

Note
A project should be created first before we could create or use a pipeline.
Click on the New button.
Input the pipeline name.
Click on the Create button.
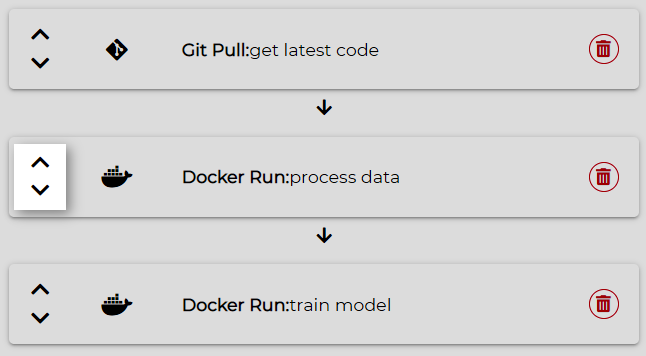
Manage Pipeline Actions
A pipeline action is a step in a pipeline procedure. Available action types:
Git pull: pull source code from git repository
Docker run: run commands in a Docker container
Model publish: publish training artifacts to model
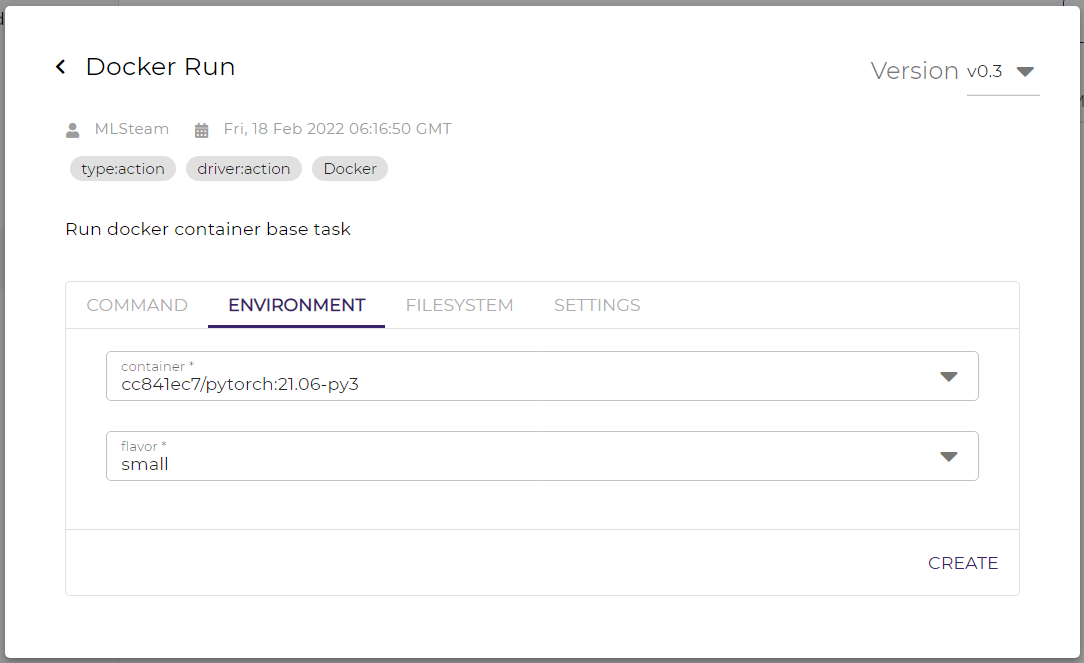
To add a pipeline action:
In the actions tab, create the NEW button.
Select the action type.
Fill in the action settings. Main action settings for different action types:
Git pull: Git URL, username, and password
Docker run: commands, container image, container flavor, and datasets
Model publish: model name, model version, and artifacts path
Note
To use datasets in a pipeline, add the dataset paths in a Docker run action.
Click on the Create button.
To edit a pipeline action:
Click on the action.
Edit the action settings.

Click on the SAVE button.
To delete a pipeline action:
Click on the delete button.

Click on the OK button.
To re-order the pipeline actions:
Hover over the left side of action.
Click on the upward or downward button to adjust the action order.
Run a Pipeline
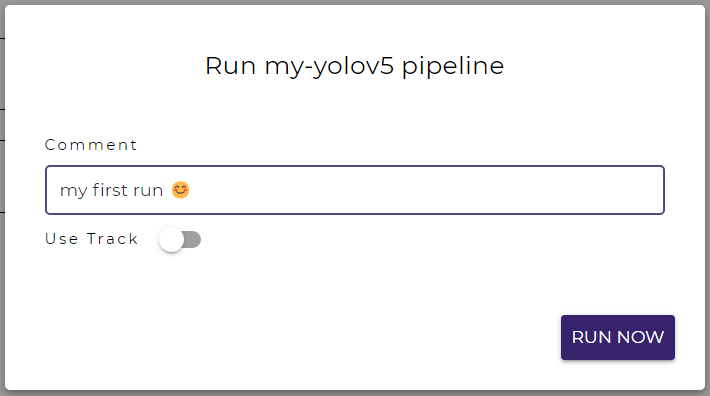
To run a Pipeline:
Click on the Run Pipeline button in the top-right corner.
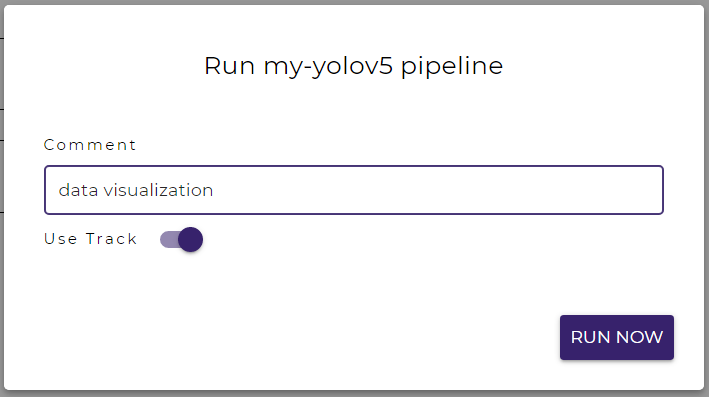
Write a comment to denote this run or leave it blank.
Click on the RUN NOW button. The pipeline will start to run in a few seconds.
Note
A pipeline run may be delayed for a while if the system is busy on processing other labs or pipeline runs.
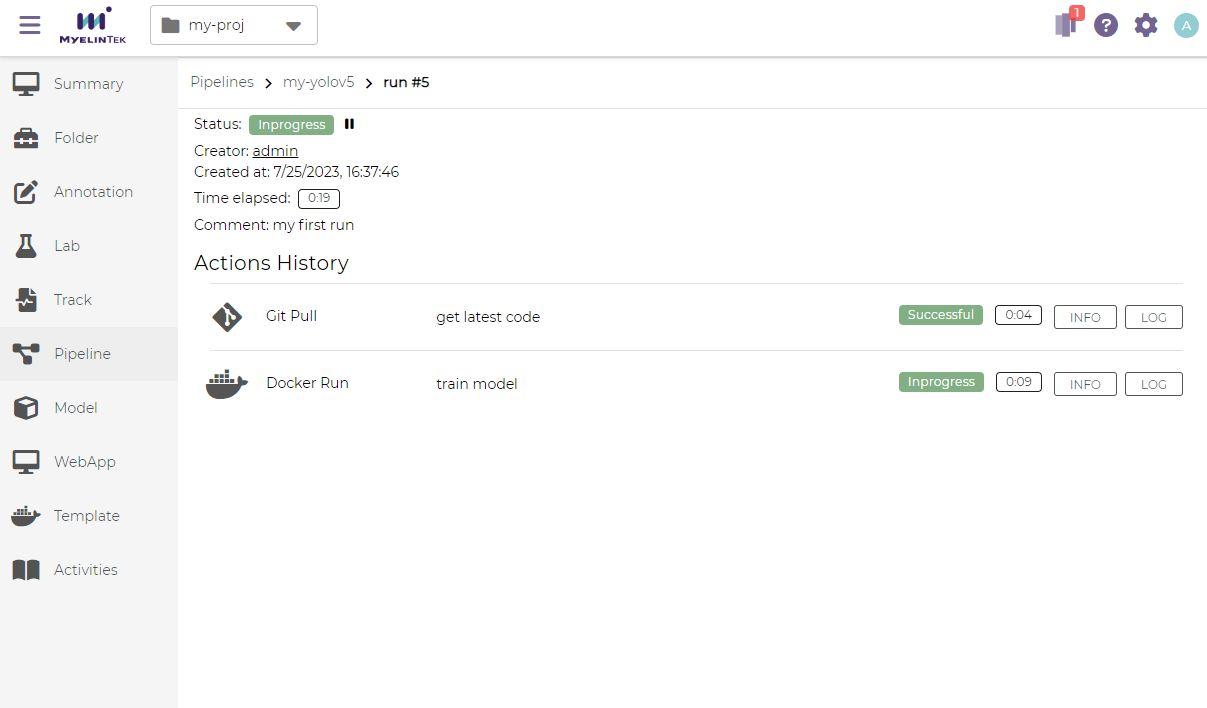
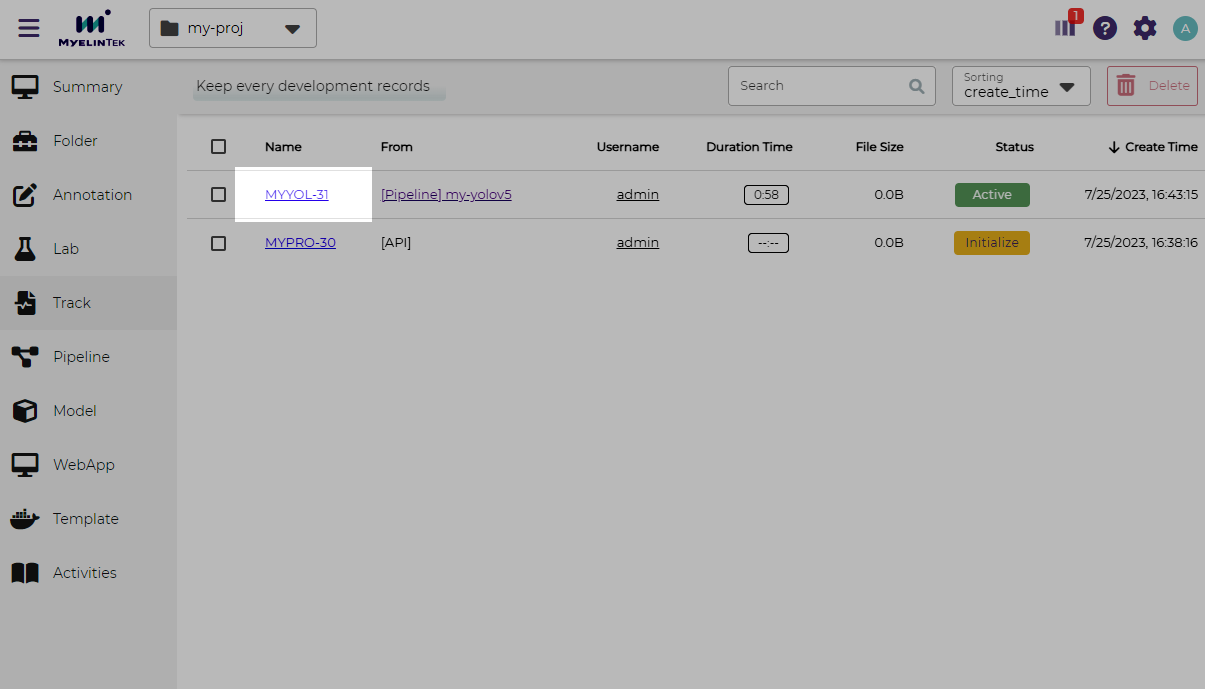
Run Status
The overall pipeline run information and the status are displayed.
Note
Pipeline runs are numbered among all pipelines in the system. The pipeline run number may not start from 1.
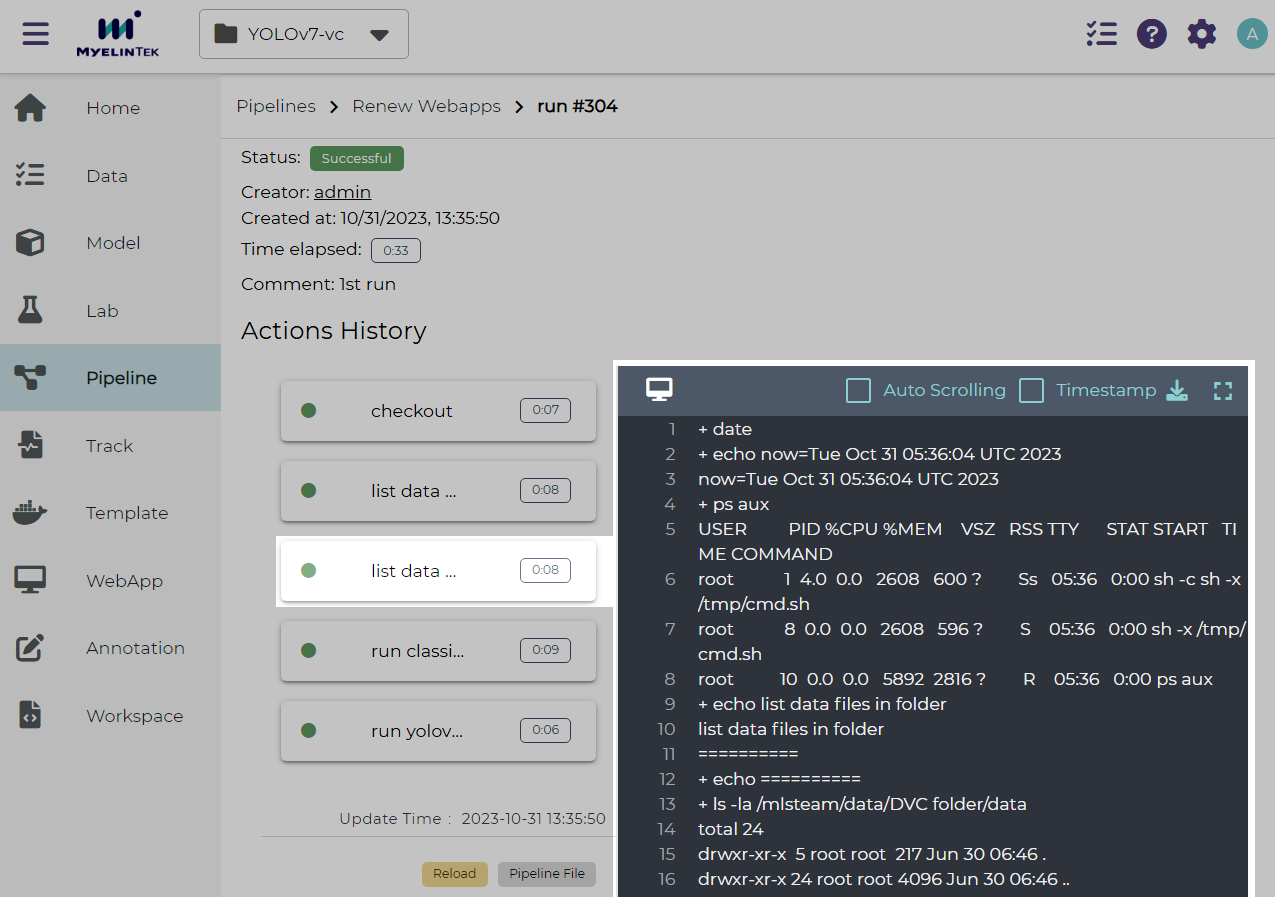
The immediate outputs of a pipeline action could be observed by clicking on the LOG button.

We could also view the outputs in full screen by clicking on the fullscreen button. Press Esc to exit the full screen mode.
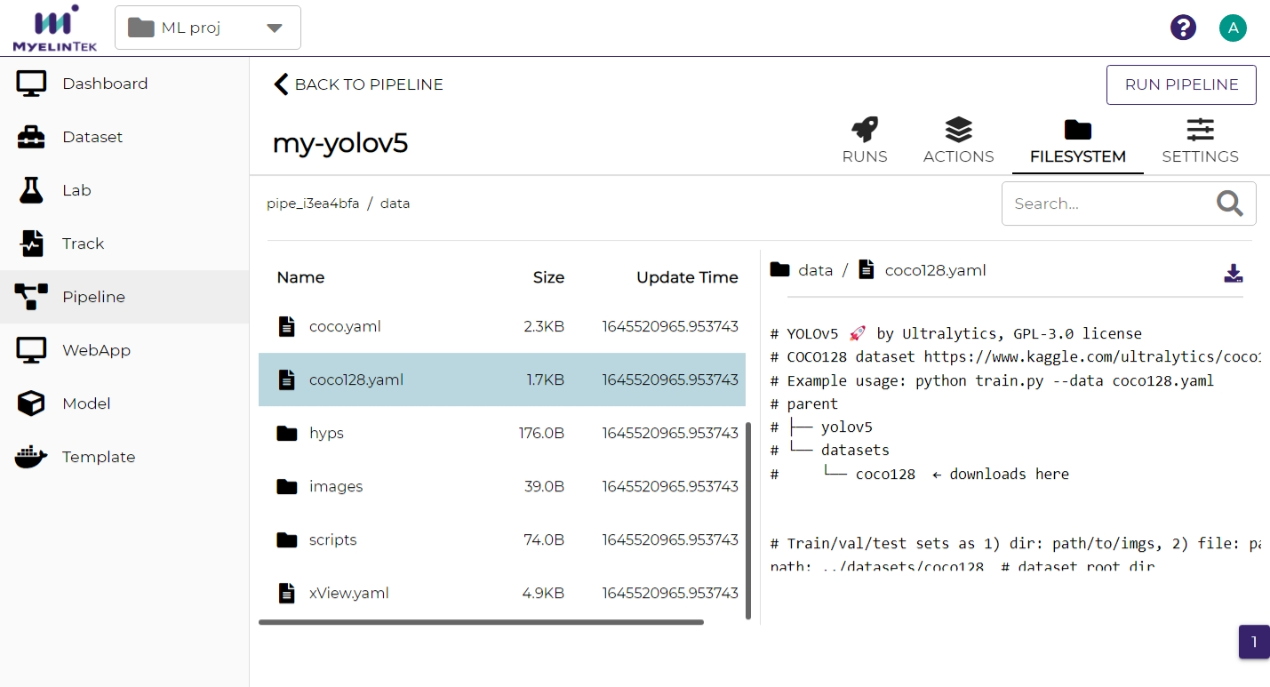
File Storage
By default, files in pipeline runs are saved in FILESYSTEM, a pipeline-specific space in the system. FILESYSTEM always keeps the latest file contents, and changes to FILESYSTEM will overwrite the contents saved in previous runs for the same pipeline.
To view the current contents in FILESYSTEM, click on the FILESYSTEM button.
To preserve the file contents in a pipeline run, toggle on Use Track on starting a run. The files in that pipeline run will be saved in a track and will not be overwritten in succeeding pipeline runs.
To view the contents in a track for a pipeline run,
Click on the TRACK button in the pipeline run page.

Alternatively, click on the corresponding track in the track listing page.
Note
A track is named by the initial part of the project name, followed by the run number.
Note
When a pipeline run uses Track, the files are displayed in the Track page. Otherwise, the files are displayed in the FILESYSTEM page.
Refer to the track documentation for data visualization and other Track operations.
Delete a Pipeline
To delete a pipeline:
Go to the settings page by clicking on the SETTINGS button.

Click on the DELETE button.

Click on the OK button.
Create a Pipeline Trigger
To run a Pipeline automatically on GitLab events:
Go to the settings page and copy Integration > GitLab > Webhook URL.
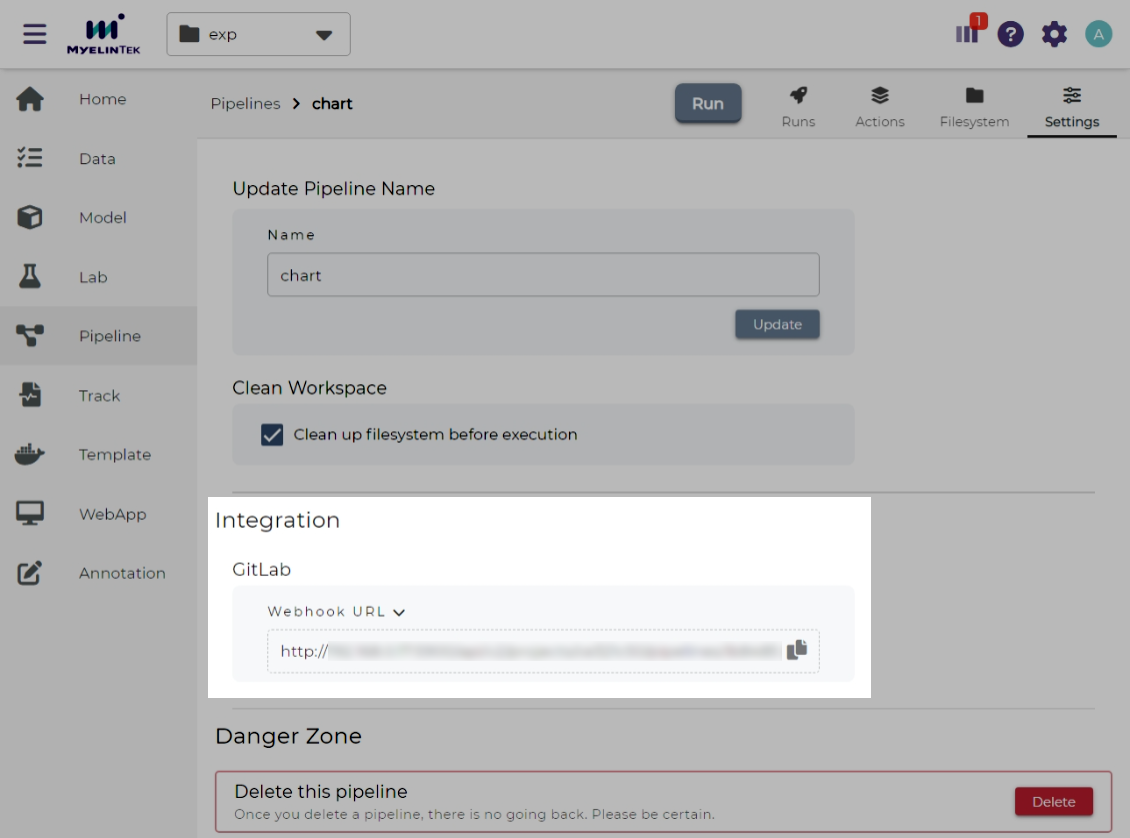
Open the GitLab web page, go to Project > Settings > Webhooks.
Paste the copied value into URL.
Select one or multiple desired trigger(s). Supported triggers:
Push events
Note
If you want to manage pushes to varied branches in different ways, use Wildcard pattern or Regular expression to restrict the source branches.
Merge request events
Deselect SSL verification > Enable SSL verification.
Click on the Add webhook button.
Now, the selected events will trigger the pipeline, and the pipeline comments have the event information.

Note
By default, GitLab does not allow setting up webhooks with URLs on local machine. Please contact the administrator to allow requests to the local network if there is such an error
Url is blocked: Requests to the local network are not allowed.GitLab may resend events one some situations. The repeated events will be skipped so that it runs only once on each distinct event.
VC Pipeline
Note
This section is about an advanced pipeline feature accessible in VC projects. Refer to the Basic Pipeline section for the pipeline feature in basic projects.
Define a Pipeline
A VC pipeline is defined by a workflow file under the .mlsteam-ci directory in the VC source repository.
A workflow file is a YAML file with the format specified in VC Workflow File.
Create a Pipeline
To create a pipeline:
Make sure a workflow file has been saved under the
.mlsteam-cidirectory in the Git repository.In the VC project page, click on the Pipeline item in the left menu.
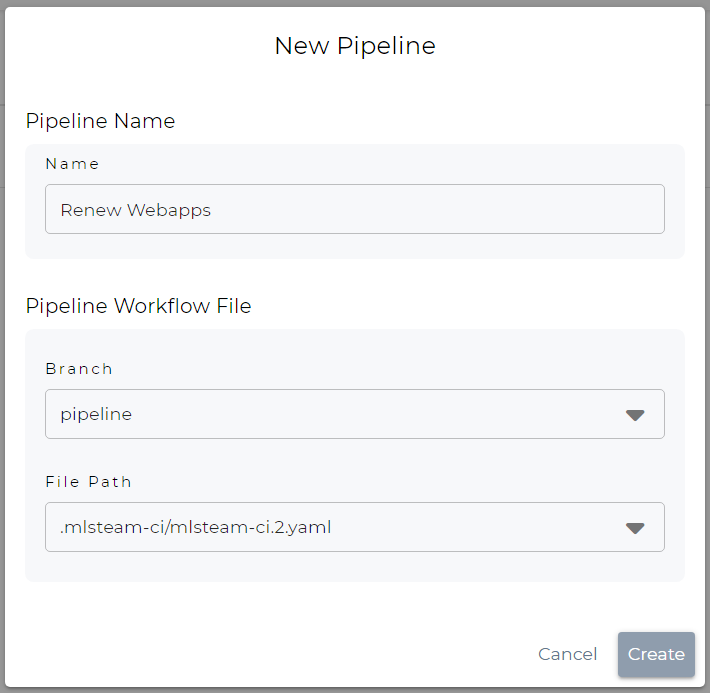
Click on the New button.
Fill in the pipeline settings, and then click on the Create button.
Name: pipeline name
Branch: Git branch of the workflow file
File Path: workflow file within the Git branch
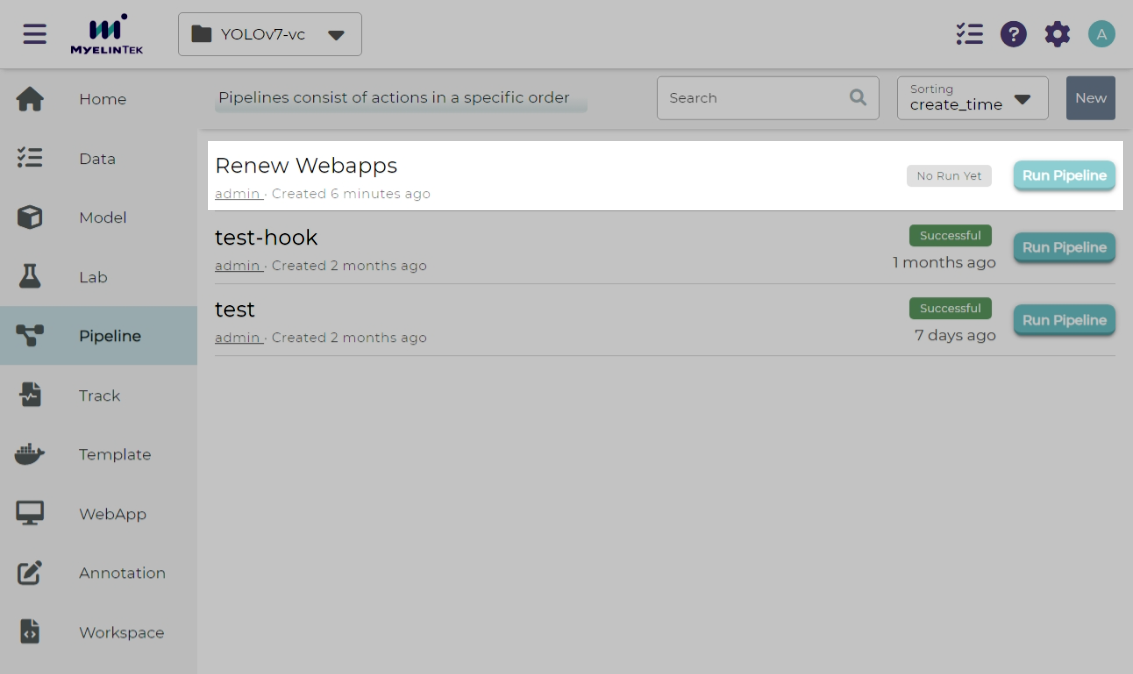
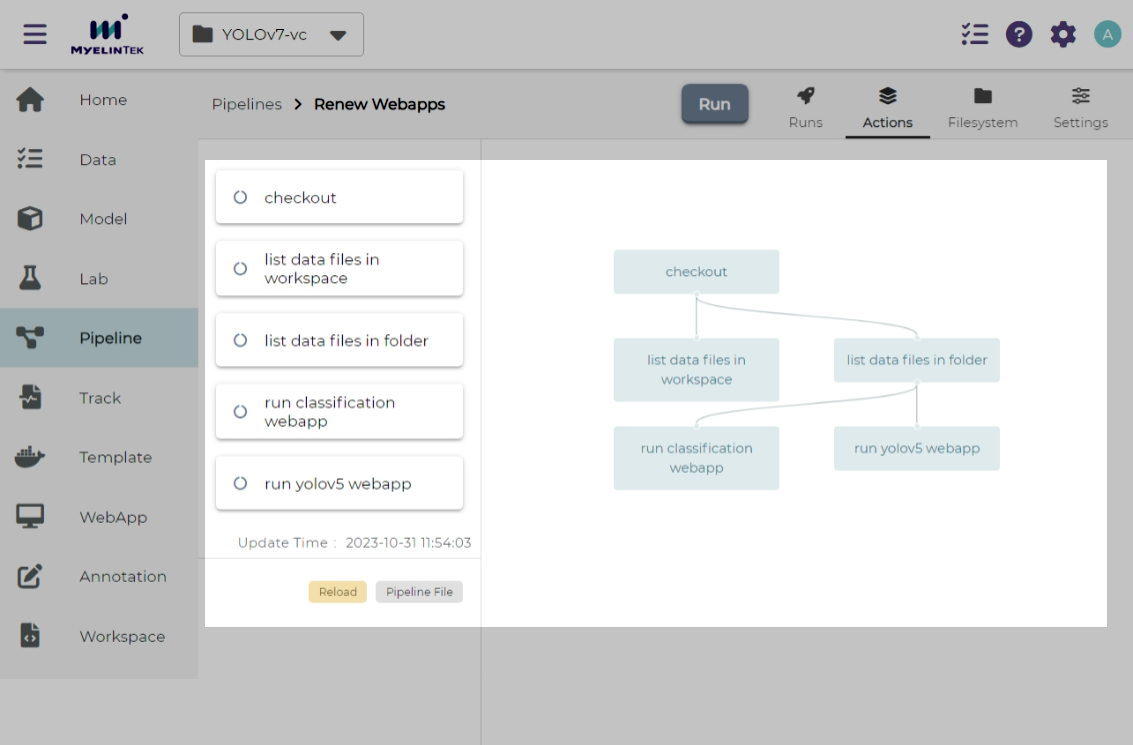
Pipeline listing page shows the new pipeline.
Pipeline actions page shows the pipeline structure.
Run a Pipeline
To run a pipeline:
Click on any of the run buttons below:
The Run Pipeline button in the pipeline listing page

The Run button in the pipeline page

Write a comment to denote this run or leave it blank.
Click on the Run button.
Pipeline runs page shows the current running status.
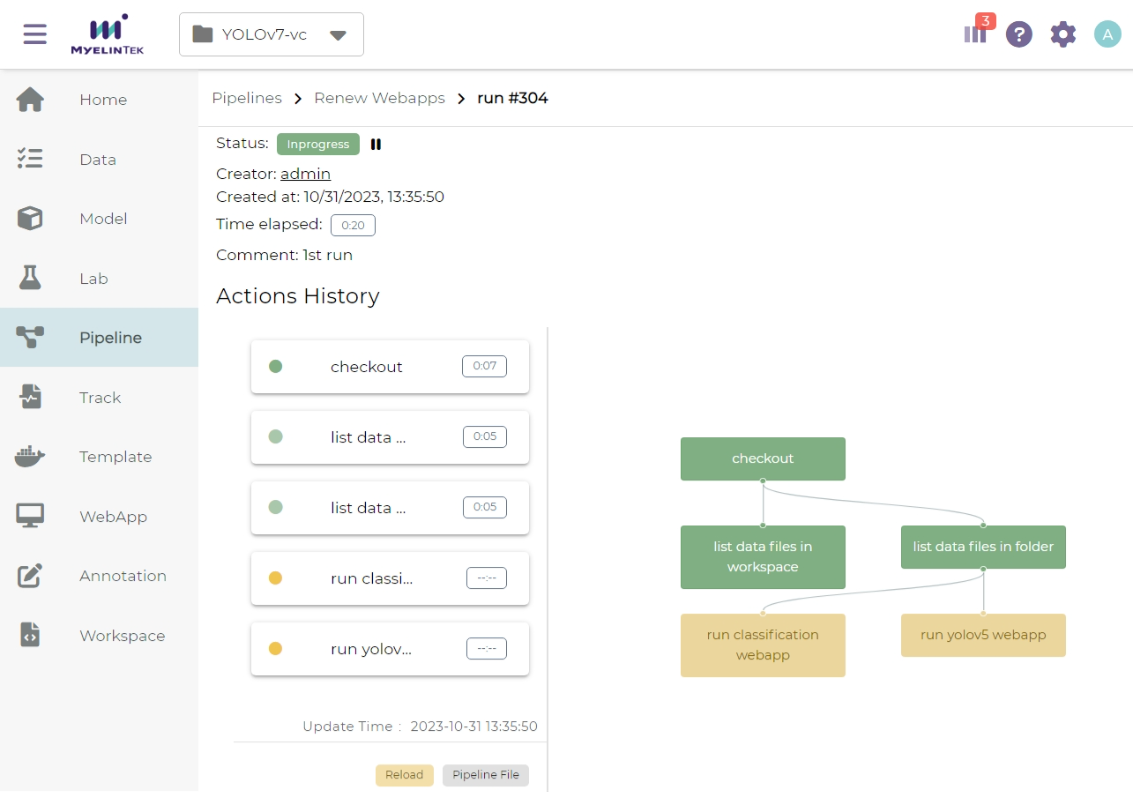
Clicking on a pipeline step bar shows the running log for the step.
VC Workflow File
The VC workflow file is a YAML file defining:
VC workflow file examples could be found here.
Format
The top-level format property specifies the workflow file spec version.
Currently, the only valid value is v0.1.
Name
The top-level name property specifies the workflow name.
Variables
The top-level vars property specifies the workflow variables to use in steps.
It is an array of variables with each item defining:
Name (required):
namespecifies the variable name, used as variable substitution identifier (case-sensitive).Type (required):
typespecifies the variable type, should be one ofstring,folder, ormodel_version.Label:
labelspecifies the variable label displayed in UI. By default, it has the same value of name.Default:
defaultspecifies the default variable value. By default, it isnull. The formats for different variable types:String type: a string
Folder type: a folder name
Model-version type:
<model_name>:<model_version>
name: ds_train
type: folder
label: Training dataset
default: yolo-sample
name: attribute_model
type: model_version
default: "face:v1"
Defaults
The top-level defaults property specifies the workflow default settings.
It is a dictionary defining:
Image:
imagespecifies the default image to run a container. By default, it is a Ubuntu-based image with mlsteam-client, mlseam-model-sdk, Python 3, and some common Linux commands pre-installed.Flavor:
flavorspecifies the default name of flavor (case-insensitive) to run a container.
Steps
The top-level steps property specifies the workflow steps.
It is an array of steps with each item defining:
Name (required):
namespecifies a case-insensitive unique step name, which will be shown in the execution page.Type (required):
typespecifies the step type, which should be one of:checkoutfor checkout stepsdocker_runfor docker-run stepstemplate_runfor template-run steps
Needs (required):
needsspecify the dependent steps. A step is considered ready to run if all the dependent steps are completed. It is defined in either way belowNull: A
nullvalue specifies no dependent steps. Such a step will be the first one to execute in a workflow. A workflow should contain exactly one step with null dependency.Previous step: A
prevalue specifies the dependency of the preceding step in the list.Dependent steps: An array of all dependent steps specified by the step names (case-insensitive). All mentioned steps should be defined before this step in the list.
Note
Requiring all dependencies should be pre-defined not only simplifies the parser but also ensures the steps to have a chronological order and thus they form a directed acyclic graph (DAG).
Step-specific properties
Note
To simplify the demonstration, the examples in the following step elements will only contain step-specific properties and a subset of other step properties. Complete step specification is required in writing a workflow file.
Checkout Step
A checkout step (with type checkout) checkouts contents from version control services.
It is a dictionary defining:
Git:
gitspecifies checking out from a git repository. By default, it checks out fromthe same git ref (a branch, tag, or commit) specified in checking out the VC workflow file, and
the git repository associated with the current VC project.
It is defined in either way below
Git ref only: A string value specifies the git ref (a branch, tag, or commit) from the git repository associated with the current VC project.
Full git settings: A dictionary defining:
Git repo (required):
repospecifies the git repository url. Currently, only public git repositories are supported.Git ref:
refspecifies the git ref to checkout. By default, it checkouts themain(or falls back tomaster) branch.
DVC:
dvcspecifies checking out from the DVC remote. It is defined in either way belowEnable DVC only: A string value specifies whether to checkout from the DVC remote. Its value should be one of
auto(default): It specifies checking out from the DVC remote iff it’s under a VC project.yes: It specifies always checking out from the DVC remote.no: It specifies never checking out from the DVC remote. This option is useful when you only need the source code but don’t want to download lots of data from the DVC remote.
Full DVC settings: A dictionary defining
Enable DVC:
enablespecifies whether to checkout from the DVC remote. Refer to the previous section for the valid values.DVC targets (required):
targetsspecify an array of DVC checkout targets. By default, all tracked data from DVC will be targeted during DVC checkout. This option is to narrow down the DVC targets to checkout and only meaningful when DVC checkout happens. A DVC target could be a path to a file or a directory within workspace. When a directory is provided, all included files or directories will be recursively checked out.
Location:
locationspecifies the checkout location, a path relative to workspace directory. By default, it is the workspace directory itself.
This simplest form checks out files from the same git ref in the associated git repository and from all the tracked files from the DVC remote.
type: checkout
This checks out files from the git release branch
and from the tracked files under the data directory from the DVC remote.
The files are saved under the <WORKSPACE>/src directory.
type: checkout
git: release
dvc:
  targets: ["data"]
location: src
Docker-Run Step
A docker-run step (with type docker_run) runs commands in a Docker container.
It is a dictionary defining:
Image:
imagespecifies the docker image tag to run container. It is omittable ifdefaults.imageis provided.Note
If MLSteam-managed image registry is enabled, the image should exist in the registry and specified with the registry prefix, such as
${MLSTEAM_IMAGE_REGISTRY}/namespace/image:tag(see built-in pipeline variables).Otherwise, the image could be any valid image tag accessible in project.
Flavor (no variable substitution):
flavorspecifies the MLSteam flavor (case-insensitive) to run container. It is omittable ifdefaults.flavoris provided. Flavors do not support variable.Folders:
foldersspecify the MLSteam folders to mount. It is an array of folders with each item defined in either way belowFolder name only:
<folder_name>specifies mounting a folder belonging to the current project at/mlsteam/data/<folder_name>.Full folder settings:
<folder_name>:<mount_path>specifies mounting a folder belonging to the current project at the specified mount path.
Run (required):
runspecifies the commands to run. POSIX shell (/bin/sh) is used to run the commands.
This prepares data for model training, assuming the requirements file and the preprocessing script are available through a previous checkout step.
type: docker_run
image: python:3.8
flavor: micro
folders: ["my-coco128"]
run: |
  pip3 -r requirements.txt
  python3 preproc.py "/mlsteam/data/my-coco128"
This retrains a model with an image in MLSteam-managed image registry, assuming the relevant files are available through a previous checkout step.
type: docker_run
image: ${MLSTEAM_IMAGE_REGISTRY}/pytorch:1.8
flavor: medium
run: |
  python3 train.py
Template-Run Step
A template-run step (with type template_run) runs tasks from an MLSteam template.
It is a dictionary defining:
Task name:
task_namespecifies the task name. By default, the name is derived from the pipeline name and step name, which does not change among pipeline executions if the pipeline settings remain unchanged.Force remove (no variable substitution):
force_removeis a boolean value specifying removing existing tasks with the same task name. By default, it istrue.Template (required):
templatespecifies the template to run. It is a dictionary defining:Name (required):
namespecifies the template name.Version:
versionspecifies the template version. By default, it is the latest version.Type:
typespecifies the template type. It does not support variable substitution. Currently, the only valid value iswebapp.
Parameters:
paramsspecifies the parameters to run template. It is a dictionary whose keys are parameter names and values are parameter values. Formats for various parameter types:Simple types (string, integer, float, boolean, and enum): Fill in the values directly.
Model type: A model-type parameter is a dictionary defining:
Name or id (required): Either
nameoridis required to specify the model.Version (required):
versionspecifies the model version. Only plaintext model versions are supported.Mount point (required):
mountPointspecifies the model mount path, E.g.,/working.
Flavor (no variable substitution):
flavorspecifies the MLSteam flavor (case-insensitive) to run the task. It is omittable ifdefaults.flavoris provided. Flavors do not support variable.Ports (no variable substitution):
portsspecify the network ports to access the task. It is an array of ports with each item defined in either way belowInternal port only:
<internal_port_number>specifies a system-assigned public port associated with a specific internal port.Full port settings:
<internal_port_number>:<public_port_number>specifies a user-assigned public port associated with a specific internal port.
Note
Specifying an internal port not covered in template may be skipped in some templates.
Folders:
foldersspecify the MLSteam folders to mount. Refer to folders in docker-run step for more detail.
This runs a classification webapp that listens at port 80 internally. All webapps with the same name will be removed during pipeline execution.
- type: template_run
  force_remove: true
  template:
    name: Classification Demo
    type: webapp
  ports: ["80"]
  flavor: micro
Examples
The examples here are for showing what a workflow file may look like. You need the relevant resources (such as files in git repository, flavors, and images) to run such a pipeline defined by this workflow file.
A minimal example:
format: v0.1
name: Minimal workflow
defaults:
  flavor: micro
steps:
  - name: checkout code
    type: checkout
    needs: null
  - name: list checked-out files
    type: docker_run
    needs: pre
    image: myelintek/pytorch:22.08  # available in "Pytorch basic 1.0" template
    flavor: small
    run: |
      pwd
      ls -la
Another example:
format: v0.1
name: PoC workflow
defaults:
  flavor: micro
steps:
  - name: checkout code
    type: checkout
    needs: null
  - name: preproc
    type: docker_run
    needs: pre
    image: ubuntu:20.04
    flavor: small
    run: |
      pip3 install -r requirements.txt
      python3 preproc.py
  - name: build img
    type: docker_build
    needs: pre
    tags: ["my_chatbot:ci"]
  - name: run model endpoint
    type: template_run
    needs:
      - preproc
      - build img
    template:
      name: my_chatbot
      type: webapp
    ports:
      - 80
Variable Substitution
Source of Variables
User-defined pipeline variables.
MLSteam built-in pipeline variables
${MLSTEAM_IMAGE_REGISTRY}: URL prefix for the MLSteam-managed image registry
${MLSTEAM_PIPELINE_EXECUTION_ID}: pipeline execution ID
${MLSTEAM_BUILD_TIME}: alias for${MLSTEAM_BUILD_TIME_UTC}
${MLSTEAM_BUILD_TIME_UTC}: build time (UTC) inYYYYmmddHHMMSSformat, such as202307051730
Scope of substitution
These step properties have no variable substitution:
name,type, andneeds
Other step properties basically have variable substitution unless it is explicitly excluded in specification.
Substitution rules
Substitution is specified by
$SUBSTITUTION_IDENTIFIERor${SUBSTITUTION_IDENTIFIER}. A substitution-identifier is a variable name (case-sensitive) or the ones defined by special substitution.Literal substitution: Substitution is done before step execution. During step execution, only the substitutions are seen rather than the variable names.
Special substitution:
Only supported in brace substitution form
${SUBSTITUTION_IDENTIFIER}.For a user-defined pipeline variable
VAR_Xof folder type:${VAR_X}will be substituted for the folder name.${VAR_X.NAME}will be substituted for the folder name (same as${VAR_X}).
For a user-defined pipeline variable
VAR_Xof model-version type:${VAR_X}will be substituted for<model_name>:<model_version_name>.${VAR_X.MODEL_NAME}will be substituted for the model name.${VAR_X.VERSION_NAME}will be substituted for the model version name.